We need to confirm the following before we go ahead with the Microsoft LAPS configuration.
1. Client operating systems – Windows Server 2019, Windows Server 2016, Windows 10, Windows Server 2012 R2, Windows Server 2012, Windows Server 2008 R2, Windows Server 2008, Windows Server 2003, Windows 7, Windows 8, Windows Vista, Windows 8.1
2. Active Directory – Windows Server 2003 SP1 or later
3. Management Tools – PowerShell 2.0 or later, .Net Framework 4.0 or later
Installing Microsoft LAPS
The next step of the configuration is to install Microsoft LAPS. To do that,
1. Download Microsoft LAPS Package from https://www.microsoft.com/en-us/download/details.aspx?id=46899
This link does have multiple .msi files. You need to download the file .msi which matches your setup. In my demo environment, I am going to use LAPS.x64.msi
2. Double click on LAPS.x64.msi file. (You need to run this as administrator)
3. It will open the new wizard. In the initial screen click Next to continue.

Figure 1: Microsoft LAPS Installation Wizard
4. Then in the next window, accept the licenses agreement and click on Next to proceed.
5. On the features window, deselect default “AdmPwd GPO Extension” and select “Management Tools”. If you also managing the local administrator account of the management server, you also need to install “AdmPwd GPO Extension”. In my demo setup, I am installing it in a Domain controller so I do not need it.
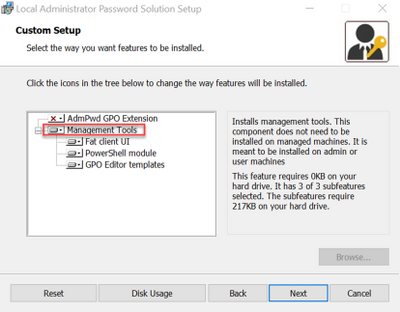
Figure 2: Install Management Tools
6. On the next page, click on Install to begin the installation process.
7. Once installation is completed, click on Finish.
Once this is done, we need to Active Directory schema to support Microsoft LAPS.
Update Active Directory Schema
Microsoft LAPS uses two new attributes in computer objects.
1. ms-Mcs-AdmPwd – Save the administrator password in clear text
2. ms-Mcs-AdmPwdExpirationTime – Save the timestamp of password expiration.
To extend AD schema,
1. Launch PowerShell as Active Directory Schema Administrator (I am using PowerShell 7.3)
2. Then import PowerShell module using
Import-module AdmPwd.PS
3. Once the module is imported successfully, run Update-AdmPwdADSchema to update the schema.
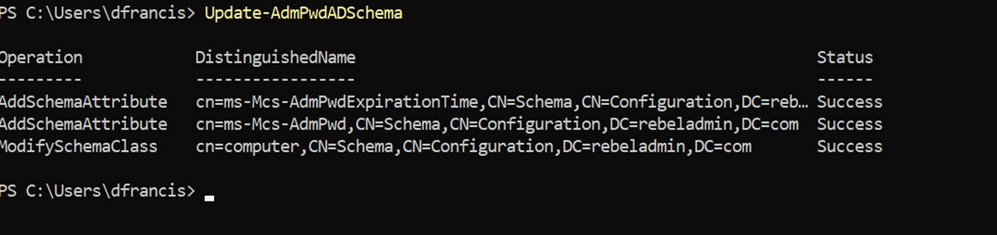
Figure 3: Update Active Directory Schema
4. After schema update, we can see these two new attributes in the computer object.
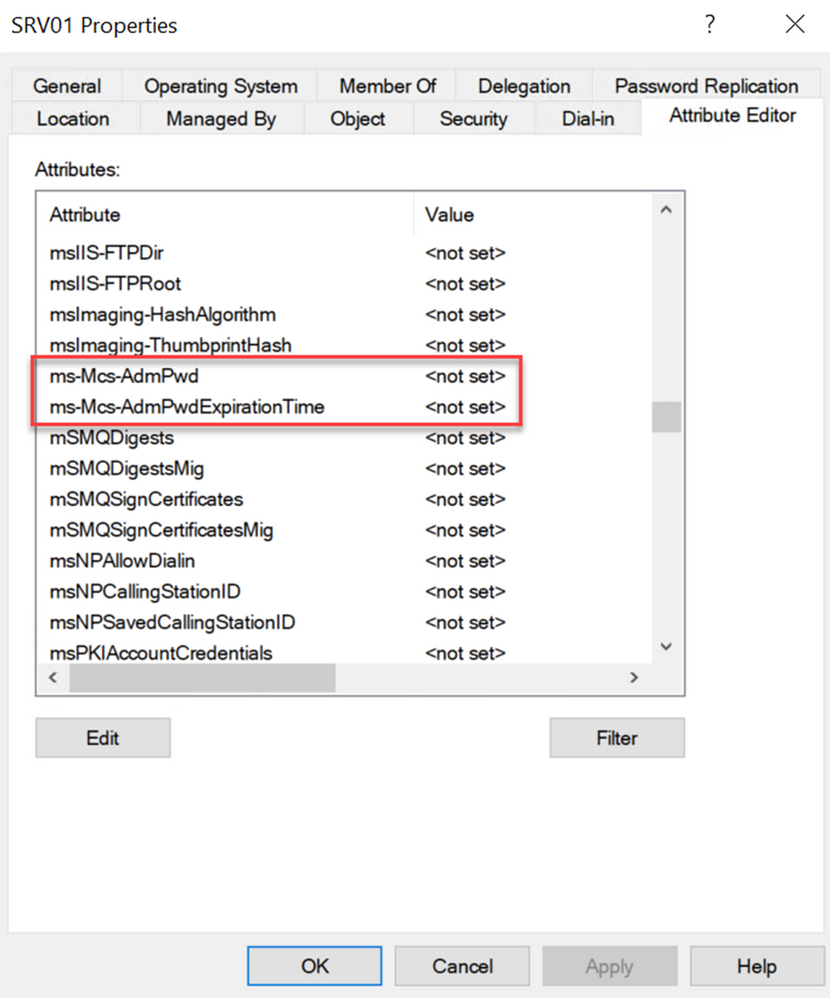
Figure 4: New Attributes under computer object
These values will be updated once we finish the rest of the configuration.
Change Computer object permissions
During the password update process, the computer object itself should have permission to write values to ms-Mcs-AdmPwd and ms-Mcs-AdmPwdExpirationTime attributes. To do that we need to grant permissions to SELF built-in account.
To do that,
1. Launch PowerShell as Domain Administrator
2. Run command Set-AdmPwdComputerSelfPermission -OrgUnit RAServers

Figure 5: Changing computer object permissions
In the above sample, “RAServers” is the OU I created for all the machine objects.
Assign permissions to the group for password access
In my demo environment, I have a security group called “ITAdmins”. I need users in this group to view the passwords for local administrators. Before we assign permissions, let’s see who had privileges to view the passwords by default.
To do that,
1. Launch PowerShell as Domain Administrator
2. Then import PowerShell module using
Import-module AdmPwd.PS
3. After, to view the users/groups with extended rights, we need to run the following command.
Find-AdmPwdExtendedRights -Identity “RAServers”
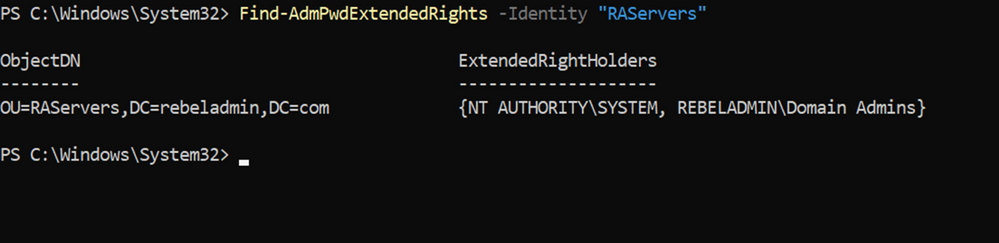
Figure 6: Verify extended rights
As we can see above, extended permissions are only applied to the Domain Admins group. It means a local administrator password for a computer object in “RAServers” OU, can only access by a domain admin account. We need to grant the same permissions to “ITAdmins” Security group. To do that we can run,
Set-AdmPwdReadPasswordPermission -Identity “RAServers” -AllowedPrincipals “ITAdmins”
4. The above command will add extended permissions to “ITAdmins” security group. We can verify it by running Find-AdmPwdExtendedRights -Identity “RAServers” | fl
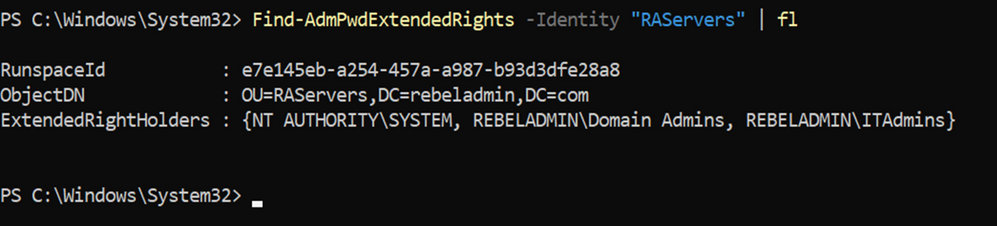
Figure 7: Updated extended rights
Microsoft LAPS required a Client-side extension installed on each device. As the next step, let’s see how we can do that.
Install CSE in Computers
There are many different methods we can use to install an agent in a computer. But in this demo, I am going to use GPO to publish and install the agent on computers.
1. Log in to Domain Controller and launch GPMC (Group Policy Management Console)
2. Create New Group Policy under RAServers OU
3. Then right click on the group policy and click on Edit
4. After that go to Computer Configuration | Policies | Software Settings | Software Installations
5. Right-click on it and select New | Package
6. It will Open up the explorer window. Then browse to a network share that has LAPS .msi file. In this demo I am using path \\dc01\LAPS\ LAPS.x64.msi and this share has read permissions to everyone.
7. Then in the next window select the deployment method as “Assigned”
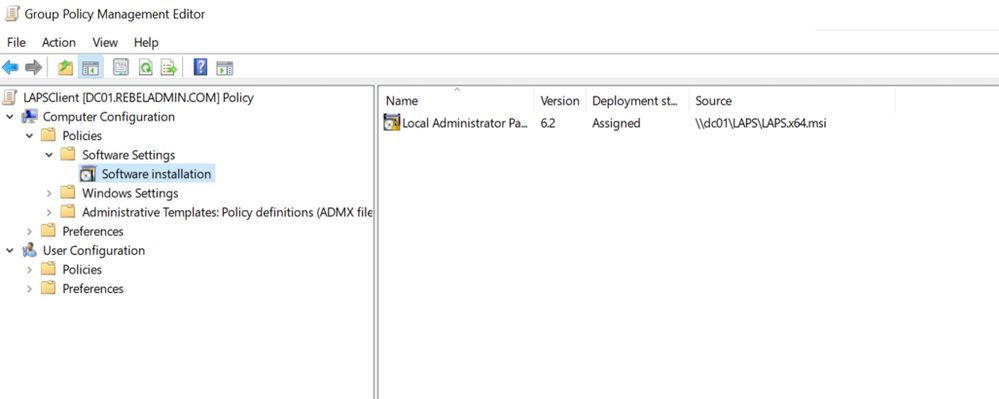
Figure 8: Install Agent using GPO
This will push agents to the Computers under RAServers OU. The installation is required a reboot on the client’s computer to complete the installation.
Create GPO for LAPS settings
Now we have everything ready for Microsoft LAPS. The only thing left is to set up a new GPO with LAPS settings.
1. Log in to Domain Controller and launch GPMC
2. Create New Group Policy under RAServers OU
3. Then right click on the group policy and click on Edit
4. In the new window go to Computer Configuration | Administrative Templates | LAPS. In there we can see four settings.
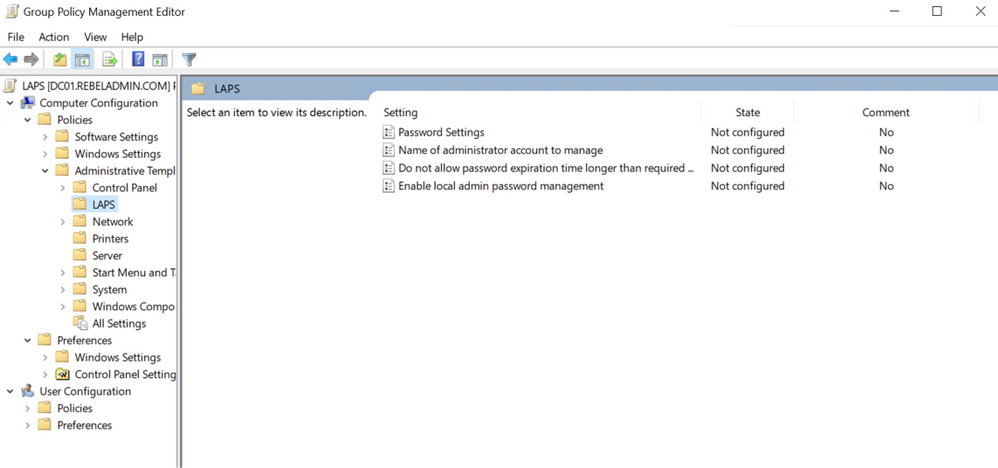
Figure 9: Microsoft LAPS GPO settings
5. Double click on “Enable local admin password management”. Then click on Enable and click OK to apply settings. This will enable password management feature.
6. After that double click on “Password Settings”. There we can define password complexity settings and password age. After all the settings are in place, click on OK.
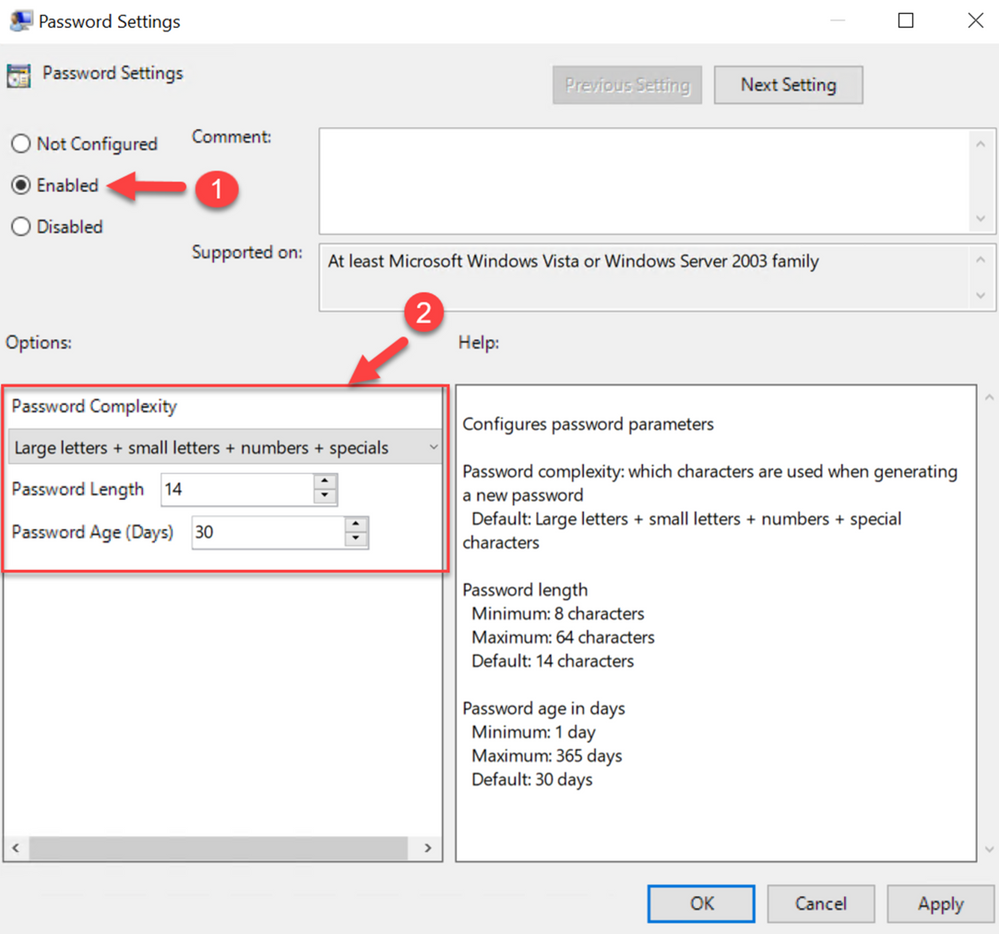
Figure 10: Microsoft LAPS GPO Settings (Password)
7. In my demo environment, the local administrator account is always “rebeladmin”. I need this account’s password to manage by LAPS. To configure that, click on “Name of administrator account to manage”. Then enable the setting and define the administrator account name.
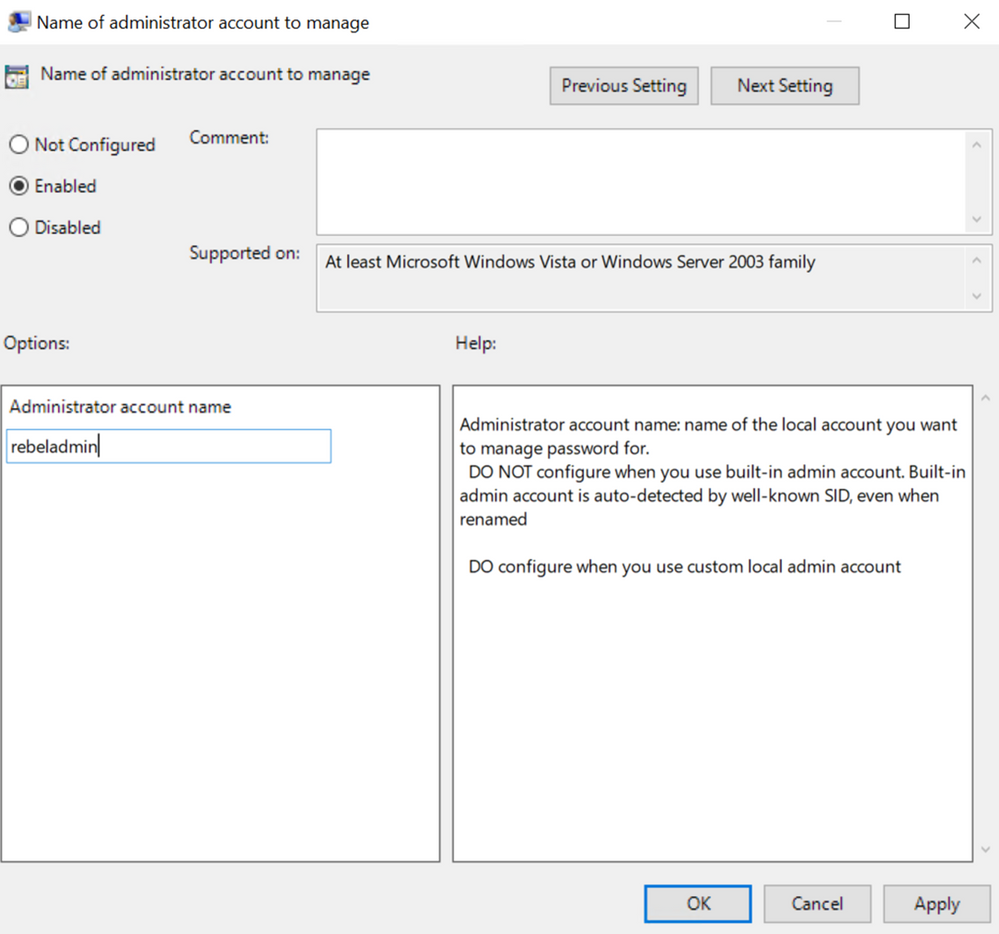
Figure 11: Microsoft LAPS GPO Settings (Name of administrator account to manage)
8. Also, I want to make sure none of the local administrator password expiry times are no longer than what is defined by the policy. To enforce this, I double-click on “Do not allow password expiration time longer than required by policy” and enable the policy setting.
This completes the configuration process of Microsoft LAPS. After this policy is applied to endpoints, we can start testing.
Testing
Once the policy is applied, there are ways to see the local administrator password.
1. Log in to the LAPS management server as a member of “ITAdmins” group.
2. Launch “LAPS UI” from programs.
3. Then type a test computer name and click on search.
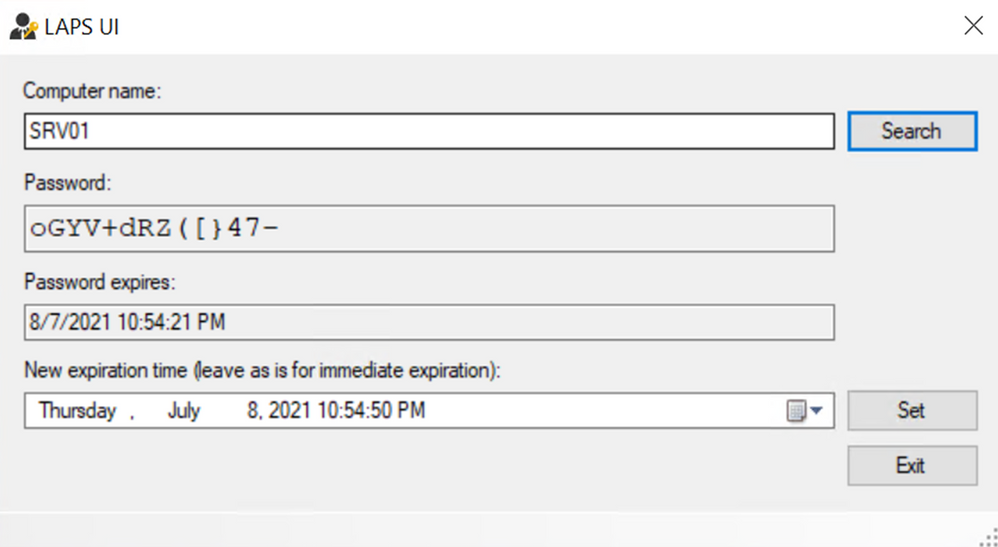
Figure 12: Checking local administrator password using LAPS UI
As we can see, LAPS changed the password of the local administrator account.
4. We also can retrieve the password using the following PowerShell command, Get-AdmPwdPassword -ComputerName SRV01

Figure 13: Checking local administrator password using PowerShell
Note : Make sure to import AdmPwd.PS PowerShell module before running the preceding command.
As we can see Microsoft LAPS is automatically changing local administrator password and recording it in Active Directory. This helps to prevent lateral movement during an identity attack.
参考连接 1