To replace SSL certificate for the AD FS Server in a Office 365 environment, you need to perform some actions to re-establish the proper functionality.
When the SSL certificate expires, the Office 365 authentication process doesn’t work and the users are no longer able to access their emails. The replacement of the SSL certificate is the only solution to get the service back.
Import and replace SSL certificate in AD FS server
To perform an SSL certificate request for AD FS, you can follow this detailed guide.
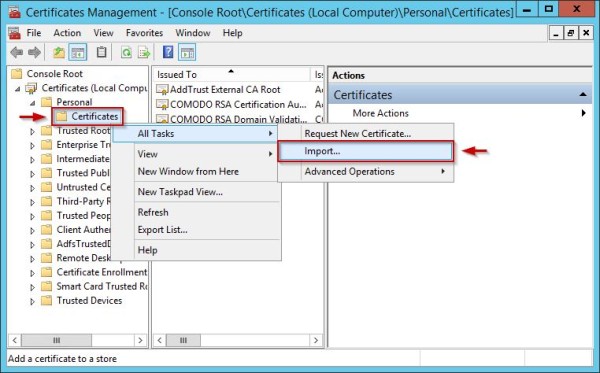
Log onto the AD FS server and from the Certificates Management Console import the new certificate to the server in the Personal certificate store. Right click Certificates item and select All Tasks > Import option.

Select the new signed SSL certificate received from the CA and click Next.

When the certificate has been imported successfully, click OK to close the window.

Make sure that the service account used to run the AD FS service is granted read access to the private key. Right click the new certificate and select All Tasks > Manage Private Keys.

Assign read permission to the service account used to run the AD FS service and click OK.

Export the new certificate including the private key and copy it to the WAP server. To export, select Certificates and right click the new imported certificate then select All Tasks > Export option.

Specify the option Yes, export the private key and click Next.

Launch the AD FS Management Console, expand Service item within the left pane and click Certificates. Under Service communications the certificate is displayed as expired. Click the link Set Service Communications Certificate to set the new certificate.

The system presents all the installed certificates. Select the valid certificate and click OK.

Click OK to close the message. The Exipration Date of the certificate under Service communications has been updated.

Restart the AD FS service.

Changes made in the GUI does not change the configuration based on the HTTP.sys. To complete the configuration, we need to identify the thumbprint of the certificate and execute a PowerShell command. Right click the new imported SSL certificate and select Open.

Select Details tab, find the Thumbprint for the new certificate and write it down removing the space.

In this example the value is e8fd5016542796214e94f72d76095f9fc587c731.
From PowerShell run the command:
Set-AdfsSslCertificate –Thumbprint <ThumbprintCertificate>
PS C:\> Set-AdfsSslCertificate –Thumbprint e8fd5016542796214e94f72d76095f9fc587c731

The command has been executed.

Restart the server or the AD FS service on the server to complete the configuration change.

Import new certificate in the WAP server
Log onto the WAP server and import the new certificate previously copied from the AD FS server . Open the Certificate Management Console, right click Certificates and select All Tasks > Import option.

The new certificate has been successfully imported.

Now open PowerShell and run the command for changing the certificate:
Set-WebApplicationProxySslCertificate –Thumbprint <ThumbprintCertificate>
PS C:\> Set-WebApplicationProxySslCertificate –Thumbprint e8fd5016542796214e94f72d76095f9fc587c731

The command has been executed.

A not well documented step is also necessary to complete the overall procedure. Checking the WAP Application certificate, the ExternalCertificateThumbprint is still pointing to the old Thumbprint. Take note also of the value in the ID field.
PS C:\> Get-WebApplicationProxyApplication | fl

From the AD FS server, double checking the AD FS certificate you can recognize the AD FS Thumbprint is different from the WAP External Certificate.
PS C:\> Get-AdfsSslCertificate

To update also the WAP Application certificate, from the WAP Server PowerShell console run the following command:
Set-WebApplicationProxyApplication –ExternalCertificateThumbprint <ThumbprintCertificate>
PS C:\> Set-WebApplicationProxyApplication –ExternalCertificateThumbprint e8fd5016542796214e94f72d76095f9fc587c731
You can get the required ID value by running the command Get-WebApplicationProxyApplication | fl (as we previously did). Just copy and paste the code.

Checking the WAP Application certificate once again, the External Certificate now reports the correct Thumbprint.
PS C:\> Get-WebApplicationProxyApplication | fl

When you manually update the AD FS certificates, you must update the Office 365 domain as well. Accessing the Event Viewer in the AD FS server you may find the certificate is pointing to a wrong Thumbprint due to not updated certificates in Office 365 domain.

Manually update the AD FS certificates
To update your Office 365 domain you must use PowerShell command. Run the following command and enter your cloud service Administrator account credentials to access the cloud service:
PS C:\ $cred=Get-Credential

Connect the cloud service.
PS C:\ Connect-MsolService –Credential $cred

Run the following command to check the current signing certificates in AD FS:
PS C:\ Get-ADFSCertificate –CertificateType token-signing

In the example, the displayed Thumbprint is associated to an expired certificate. To generate a new certificate run the command:
PS C:\> Update-ADFSCertificate –CertificateType token-signing

Verify the update to check if the certificate has been created.
PS C:> Get-ADFSCertificate –CertificateType token-signing

A primary and a secondary certificates have been created with new Thumbprint values. In AD FS Management Console the new certificates are displayed under Token-signing area.

Whilst the local AD FS authentication starts working again, trying to connect Office 365 the access to web application can’t be completed. Looking at the Event Viewer, the WAP server is not able to contact the AD FS server.

The AD FS server reports is not possible for WAP server to authenticate.

This scenario occurs when the trust relationship between AD FS and WAP servers is broken.
Re-establish trust between WAP and AD FS
From WAP server, retrieve the list of installed certificates with the command:
PS C:\ Get-ChildItem -path cert:\LocalMachine\My

The error displayed in the Event Viewer reports that the trusted certificate begins with Thumbprint BB59AB2 while the imported certificate begins with 369083A.
To re-establish trust between AD FS and WAP, on the WAP server run the following command entering the local Domain Administrator account credentials (es. NOLABNOPARTY\Administrator):
Install-WebApplicationProxy -CertificateThumbprint <ThumbprintCertificate> -FederationServiceName <sts.domain.com>
PS C:\ Install-WebApplicationProxy -CertificateThumbprint e8fd5016542796214e94f72d76095f9fc587c731 -FederationServiceName sts.nolabnoparty.com

The configuration is being performed in the system.

When the process has completed, the system displays the message DeploymentSucceded.

Under Token-decrypting area the Expiration Date of the certificate is now shown as valid.

The trust between WAP and AD FS has been restored as confirmed in the Event Viewer.

The access to Office 365 environment is now restored and user can access their emails again. Keep in mind to check your certificates expiration date on regular basis to avoid service interruption.